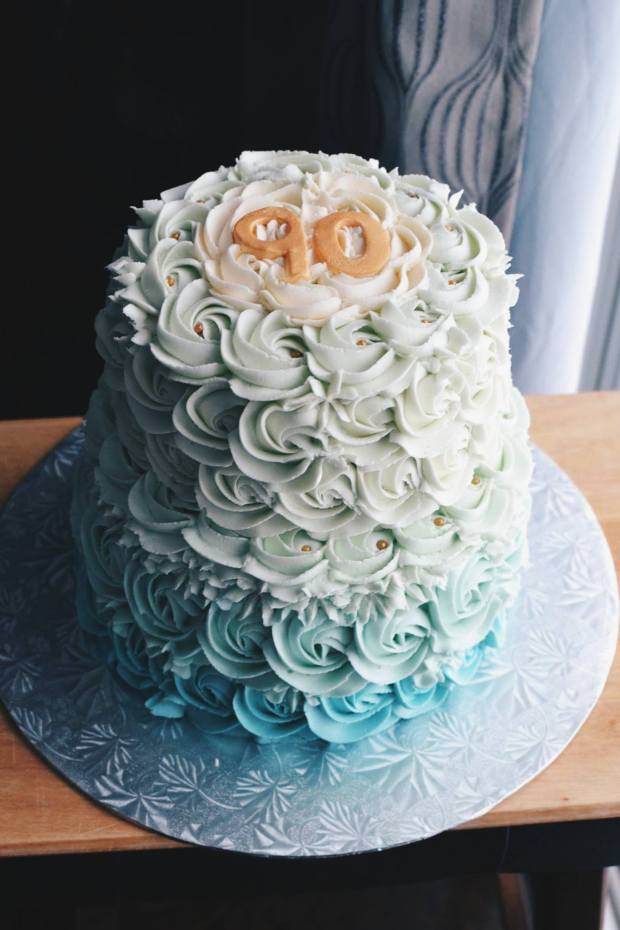


This weekend I had a cake order for a couple who were both turning 45. The wife thought it was a good idea to put 90 on the cake, for the combination of both ages. I loved it!
This is a 2-tiered lemon cake (8″ on the bottom, 6″ on the top) with raspberry filling and vanilla buttercream. I decorated it in ombre roses. It’s a very simple technique and quite easy to do. You need to make about 2 big batches of buttercream, and split them up into however many bowls of different colours you want. For this cake I split it up into five bowls. I started with dying the darkest colour first, and so on and so forth.


LEMON CAKE
Ingredients:
- 1 cup (250 mL) unsalted butter, softened
- 2 cups (500 mL) granulated sugar
- 4 eggs
- 1 tbsp (15 mL) grated lemon zest
- 2 tsp (10 mL) vanilla
- 3 cups (750 mL) all-purpose flour
- 1 tbsp (15 mL) baking powder
- 1 tsp (5 mL) baking soda
- 1/2 tsp (2 mL) salt
- 1-2/3 cups (400 mL) milk
- 2 tbsp (30 mL) lemon juice
Directions:
- In a large bowl, beat butter with sugar until fluffy. Beat in eggs, 1 at a time; beat in lemon zest and vanilla.
- Whisk together flour, baking powder, baking soda and salt; stir into butter mixture alternately with milk, making 3 additions of flour mixture and 2 of milk.
- Gently fold in lemon juice to make curdled-looking batter.
- Divide between 2 greased and parchment paper–lined 9-inch (1.5 L) round cake pans.
- Bake in 350ºF (180ºC) oven until cake tester inserted in centre comes out clean, 30 to 35 minutes.
- Let cool in pans on rack for 10 minutes; transfer to rack and let cool completely.
RASPBERRY FILLING
Ingredients:
- 1 package (16oz) of frozen raspberries
- 1/3 cup granulated sugar
- 3 tablespoons cornstarch
- 1 teaspoon lemon juice
Directions:
- Drain raspberries, reserving liquid.
- Add enough water to liquid to equal 1 1/4 cups.
- In large saucepan, combine liquid, sugar, cornstarch and lemon juice; mix well.
- Heat and stir until mixture boils and thickens. Cool completely.
- Stir thawed raspberries into cooled mixture.
VANILLA BUTTERCREAM
Ingredients:
- 1/2 cup solid vegetable shortening
- 1/2 cup (1 stick) butter, softened
- 1 teaspoon clear vanilla extract
- 4 cups sifted icing sugar
- 2 tablespoons of milk
Directions:
- In large bowl, beat shortening and butter with electric mixer until light and fluffy. Beat in vanilla.
- Gradually add icing sugar, one cup at a time, beating well on medium speed. Scrape sides and bottom of bowl often. When all sugar has been mixed in, icing will appear dry.
- Gradually add milk; beat at medium speed until light and fluffy.
If you want to follow exactly the way I made this cake, here are the steps listed below:
- I sliced my two cakes in half, leaving me with 4 layers.
- I placed my first cake layer on the cake board, and added a layer of my vanilla buttercream, followed with a thin layer of the raspberry filling (you don’t want to add a thick layer of the raspberry filling, because remember by the end you will have 3 layers of the raspberry filling, so you don’t want it to be over-powering because it is quite sweet tasting).
- Next, I added another cake layer and repeated the same steps, until I used up all my cake layers.
- Once all my cake layers were stacked, with the two fillings in-between, I added a crumb coat** of buttercream around the outside.
- I placed it in the freezer for 20 minutes to allow it to harden really well. Typically, I will set it in the freezer for 10 minutes (doesn’t need to be too long) but because there was raspberry filling coming out the sides when I did the crumb coat, I wanted to make sure the raspberry filling was locked in tight. You want to avoid any raspberry poking through your final layer of buttercream)
** A crumb coat is a thin layer of buttercream around the outside of the cake, to lock in any crumbs so they don’t get into your final layer of buttercream.


 I’ve only ever made